Git
约 1088 个字 113 行代码 4 张图片 预计阅读时间 6 分钟
使用 
个人使用:init、rm、commit、push、pull
git init
git remote -v
git remote add origin + ssh
git remote rm origin

git pull origin [branch]:[master]
git add .
git commit -m ""
git push origin [master]:[branch]

# 本地初始化项目
git config --global user.name "你的名字或昵称"
git config --global user.email "你的邮箱"
分支操作 
# 创建分支、更改
git checkout -b <branch_name>
git branch -a
git branch -d <branch_name> //删除分支
git push origin --delete <branch_name>
回退 
git log
git log --pretty=oneline
格式化 log 形式,每条 log 只有一行,只包含 完整的 hash 值 和 提交的备注;
git log -n 3
git log --graph
git reset --hard + commit_id
git reset --hard HEAD^
只能后退,一个 ^ 表示回退一个版本,两个 ^ 表示回退两个版本,依次类推
git reset --hard HEAD~n
Tag
git tag v1.0.0
git tag -a v1.0.0 -m "Release version 1.0.0"
git push origin v1.0.0
git push origin --tags
git tag -d v1.0.0
git push origin --delete v1.0.0
git push origin :refs/tags/v1.0.0
Pull Request
PR,全称 Pull Request(拉取请求
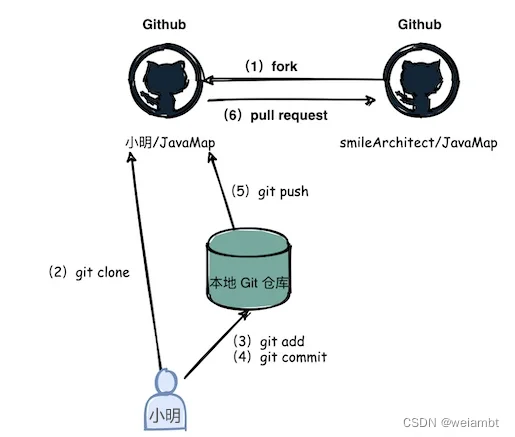
- fork 原仓库 A 到我的仓库 B(B 是 A 的 fork 版本)
- 将仓库 B clone 到我本地电脑
- 在本地创建一个分支,如 bugfix/issue-12,该分支用于存放我的代码修改。同时在我的 github 上的仓库 B 也创建一个同名的该分支
- 切换到该分支 bugfix/issue-12,修改代码
git checkout -b bugfix/issue-12
- 修改好了,add,commit,然后 push 到我远程的仓库 B 的 bugfix/issue-12 分支
git push -u origin bugfix/issue-12
- 在我的 github 的仓库 B 中创建 pull request。选择仓库 B 的该分支,推送到原仓库 A 的某一个分支。具体是哪个分支,参考仓库 A 的 contributing 说明,一般是 dev 分支;如果没说,就只能选择 master 分支咯
【Git】PR 是啥?一篇文章学会 Pull Request 到底是干嘛的 _github pull request-CSDN 博客
git commit规范 
为了方便使用,我们避免了过于复杂的规定,格式较为简单且不限制中英文:
<type>(<scope>): <subject>
// 注意冒号 : 后有空格
// 如 feat(miniprogram): 增加了小程序模板消息相关功能
scope 选填表示 commit 的作用范围,如数据层、视图层,也可以是目录名称
subject 必填用于对 commit 进行简短的描述
type 必填表示提交类型,值有以下几种:
- feat - 新功能 feature
- fix - 修复 bug
- docs - 文档注释
- style - 代码格式 ( 不影响代码运行的变动 )
- refactor - 重构、优化 ( 既不增加新功能,也不是修复 bug)
- perf - 性能优化
- test - 增加测试
- chore - 构建过程或辅助工具的变动
- revert - 回退
- build - 打包
合并 
合并 commit 
git rebase 合并最近 N 个 commit 
git rebase -i HEAD~N
squash 写法(关键)
pick   <commit1>
squash <commit2>
squash <commit3>
规则:第一个必须是 pick,后面才能 squash
操作流程 
git rebase -i HEAD~N- 保留第一个 pick,其余改成 squash
- 保存退出
- 编辑最终 commit message
git rebase --continue
merge vs rebase vs squash
| 方式 | 本质 | 历史形态 | 是否改历史 | 什么时候用 |
|---|---|---|---|---|
merge |
两条线合并 | 有 merge 节点 | 否 | 公共分支、安全第一 |
rebase |
把提交挪位置 | 一条直线 | 是 | 整理个人提交 |
squash |
多个变一个 | 一条直线 | 是 | 提 PR / 上 main |
放弃本地修改,强制覆盖 
# 1. 放弃本地所有修改(包括未提交的、冲突的)
git reset --hard HEAD

# 2. 拉取远程最新版本,强制覆盖本地
git fetch origin
git reset --hard origin/main

# 3. 清理未跟踪文件
git clean -fd

# 现在本地与云端完全一致
进阶 
Pre-Commit
submodule
git submodule add <repo-url> <path>
这会在你的 repo 中生成:
.gitmodules文件目录(但内部是一个独立 Git 仓库)
git submodule update --init --recursive
git pull origin main
cd ..
git add .
git commit -m "update yyy submodule"
git submodule deinit -f third_party/yyy
git rm -f <path>
rm -rf .git/modules/<path>
配置 
git 的安装 
创建个人令牌 
Setting
-> Developer settings
-> Personal access tokens
-> Generate new token 保存密码到自己可以看到的位置
免密登陆 
# 记住密码
git config --global credential.helper store
# 删除密码
git config --global --unset credential.helper
github 配置 ssh 
cd ~
ssh-keygen -t rsa -C "xxx@xxx.com" # 这里输入你的邮箱
cd .ssh
cat id_rsa.pub # 复制到 github 的 ssh 设置中
 点击右上角的 settings
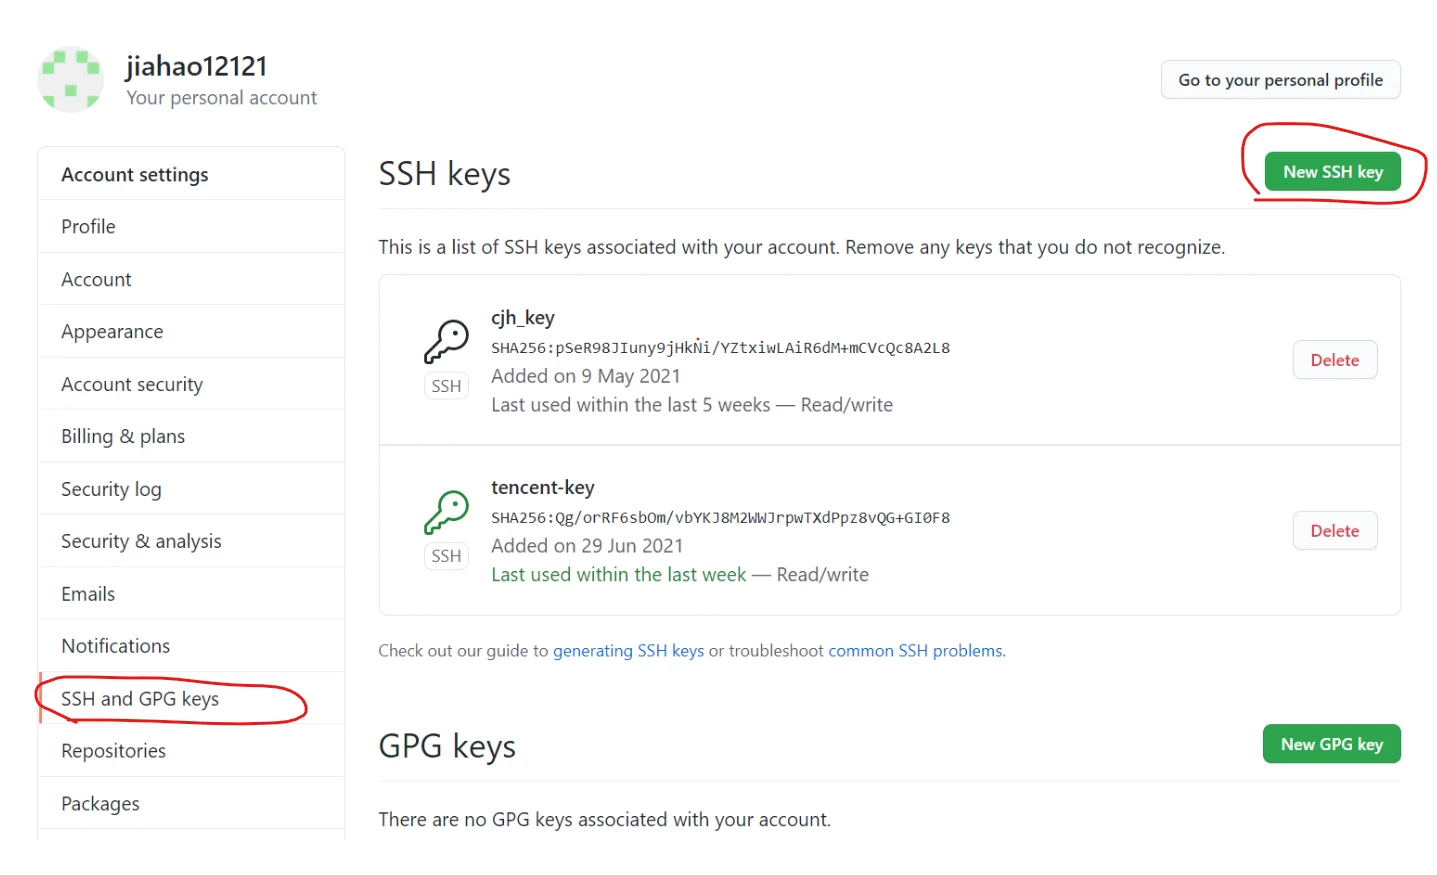
将刚才复制的内容粘贴到这里
验证是否成功
ssh -T git@github.com
显示如下信息表明设置成功

SSH
- 连接虚拟机
ifconfig #记录 ip 地址
ssh user.name@ip
设置 ssh 免密登录 
在 win 主机上ssh-keygen生成一对公私钥,将公钥发送到服务器的~/.ssh/authorized_keys文件下
在 win 主机上的 ssh 配置中加入IdentityFile文件,即可实现免密登录
git 代理 
#http 代理
git config --global http.proxy 'http://127.0.0.1:7890'
#https 代理
git config --global https.proxy 'http://127.0.0.1:7890'
#http 代理
git config --global http.proxy 'socks5://127.0.0.1:7890'
#https 代理
git config --global https.proxy 'socks5://127.0.0.1:7890'

#取消 http 代理
git config --global --unset http.proxy
#取消 https 代理
git config --global --unset https.proxy
.gitignore 的配置 
有时候不想要.git , .DS_Store等文件,那么就需要在.gitignore中写清楚
git rm -r --cached .DS_Store
git rm -r --cached **/.DS_Store
原理 
missing semester
版本控制 (Git) · the missing semester of your cs education
6. Lecture 6 - 版本控制 git_ 哔哩哔哩 _bilibili
问题与解决 
连接不上port 443 Couldn‘t connect to server 
- 方案一:关闭 VPN
- 方案二:取消代理
git config --global --unset http.proxy
git config --global --unset https.proxy
拒绝连接connect to host github.com port 22: Connection refused 
- 使用
github 443端口
给~/.ssh/config文件里添加如下内容,这样 ssh 连接 GitHub 的时候就会使用 443 端口。
Host github.com
  Hostname ssh.github.com
  Port 443
https和git链接换着试试
url = https://github.com/username/repo.git
url = git@github.com:username/repo.git
- 换梯子节点,检查 DNS 污染
推送失败src refspec master does not match any 
按照下面的顺序执行
git commit -m "init"
git remote add origin xxxxxxxx.git
git push -u origin master
远端链接失败fatal: Couldn‘t find remote ref master 
# 检查本地配置
git config user.name/git config --global user.name
git config user.email/git config --gloabl user.email

# 检查仓库配置
git remote -v
git remote rm origin
git remote add origin XXXX
文件过大RPC failed;curl 56 Recv failure: Connection was reset 
git config --global http.postBuffer 524288000
如果设置之后提交还是报错的话,可能是因为某几个文件过大造成的;
这时就需要用到 git-lfs 具体用法见官网
git lfs install
git lfs track "*.so"
git add .gitattributes
Host key verification failed
重新配置一下 ssh,删除~/.ssh文件夹,重新生成 ssh key,然后再次连接。
具体操作看配置/github 配置ssh一节